Key Takeaways
- Premium and discount zones divide a price range into “expensive” (premium) and “cheap” (discount) areas — based on where the midpoint is.
- The simple rule: buy in the discount zone (cheap), sell in the premium zone (expensive) — the institutional version of “buy low, sell high.”
- The midpoint (50% level) of a range is the dividing line: above it is premium, below it is discount.
- This concept stops beginners from buying at the top and selling at the bottom — the single most common way retail traders lose.
- Premium and discount work best combined with structure and other concepts, not used alone — and knowing them is not the same as trading them well.
Most retail traders do the exact opposite of what they should. They buy when price is high and feels exciting, and they sell when price is low and feels scary. They buy expensive and sell cheap — the precise reverse of how anyone makes money in any market. And they have no idea they are doing it.
Premium and discount zones fix this. They give you a simple, visual way to know whether price is currently “expensive” or “cheap” within its range — so you can do what the smart money does: buy when it is cheap, sell when it is expensive. It is the institutional version of “buy low, sell high,” made concrete and visual on your chart.
This guide explains premium and discount zones in the simplest possible terms — what they are, how to find them, and how to use them to stop trading from the wrong side of the market. Plain language, clear examples, built for a beginner. By the end, you will look at every chart and instantly know whether price is in a zone to buy or a zone to sell. Let us get into it.
What Are Premium and Discount Zones — In Plain English?
Let us define it as simply as possible.
Premium and discount zones divide a price range into two halves: the premium zone (the expensive upper half) and the discount zone (the cheap lower half).
Think about how you shop in real life. When something is in the “discount” section, it is cheap — a good time to buy. When something is selling at a “premium,” it is expensive — a good time to sell if you own it, and a bad time to buy. Premium and discount zones apply this exact logic to price on a chart.
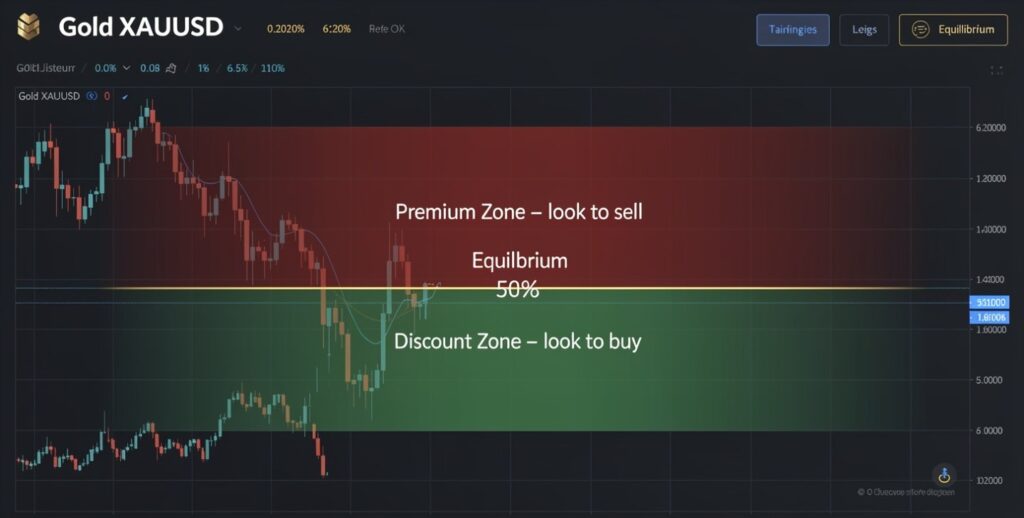
Here is how it works. You take a price range — a clear high and a clear low. You find the midpoint, the 50% level right in the middle. That midpoint is called “equilibrium” — the fair value, the balance point. Then:
- Above the midpoint = the premium zone. Price here is “expensive” relative to the range. This is where you look to SELL.
- Below the midpoint = the discount zone. Price here is “cheap” relative to the range. This is where you look to BUY.
That is the whole concept. Price above the middle of its range is premium (expensive, sell zone). Price below the middle is discount (cheap, buy zone). The midpoint divides them. It is genuinely this simple — and yet it solves one of the most common and costly mistakes beginners make: buying expensive and selling cheap. For the broader framework behind why institutions trade this way, read our beginner guide on what ICT concepts are in forex trading.
— Data Pips Team
Why Premium and Discount Zones Matter So Much
This concept solves the single most common reason retail traders lose: they trade from the wrong side of the range. Let us explain why this happens and why it is so destructive.
Human psychology pushes traders to do the wrong thing. When price has been climbing for a while and is high (premium), it feels strong, exciting, and safe — so beginners buy, right at the expensive top, often just before it reverses. When price has been falling and is low (discount), it feels weak, scary, and dangerous — so beginners sell or avoid buying, right at the cheap bottom, often just before it bounces.
This is backwards. The smart money does the opposite. Institutions accumulate (buy) when price is cheap in the discount zone, and they distribute (sell) when price is expensive in the premium zone. They buy from the panicking retail sellers at the bottom and sell to the excited retail buyers at the top. The premium/discount framework lets you see what they see — and position yourself on their side instead of being their exit liquidity.
By simply asking “is price in premium or discount right now?” before every trade, you filter out a huge category of bad trades. You stop buying at expensive premium levels. You stop selling at cheap discount levels. You start buying in discount and selling in premium — aligning yourself with how money is actually made. This one filter, applied consistently, can transform a beginner’s results, because it directly counteracts the natural psychological tendency to trade from the wrong side.
How to Find Premium and Discount Zones
Finding these zones is straightforward. Here is the step-by-step method:
Step 1: Identify a Clear Range
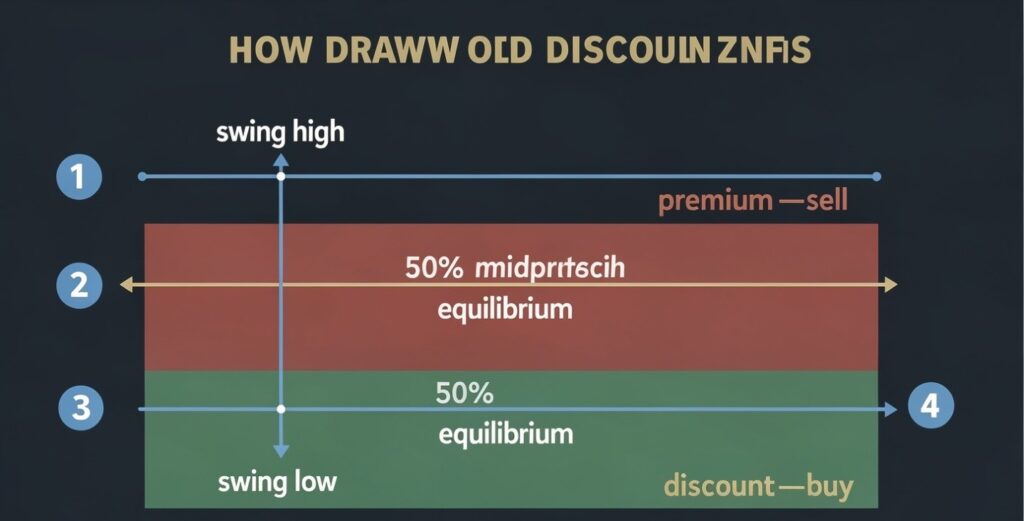
First, find a clear price range with an obvious high (swing high) and an obvious low (swing low). This could be the range of a recent significant move, a trading session, or a larger structural swing. The key is that the high and low should be meaningful, significant points — not random tiny wiggles. Reading market structure correctly is the foundation here, since you need to identify the right swing high and swing low to define your range.
Step 2: Find the Midpoint (50% Level)
Once you have your high and low, find the exact midpoint between them — the 50% level. This is your equilibrium line. Most trading platforms have a Fibonacci retracement tool that makes this instant: draw it from the low to the high (or high to low), and the 50% level is marked automatically. Fibonacci retracement is the standard tool traders use for this, and the 50% level is the dividing line you care about most.
Step 3: Mark the Zones
Everything above the 50% midpoint is the premium zone (sell zone). Everything below the 50% midpoint is the discount zone (buy zone). Some traders shade these areas on their chart for clarity — premium in one color, discount in another. Now you can instantly see which zone price is currently in.
Step 4: Apply It to Your Trade Direction
Use the zones to filter your trades. If you are looking for buys, wait for price to be in the discount zone (cheap). If you are looking for sells, wait for price to be in the premium zone (expensive). Combine this with your trend direction: in an uptrend, look to buy when price pulls back into the discount zone; in a downtrend, look to sell when price rallies into the premium zone. This combination — trend plus premium/discount — is powerful.
Combining Premium/Discount With Other Concepts
Premium and discount zones become far more powerful when combined with the other concepts in your toolkit. This is where the real edge develops — not from the zones alone, but from stacking them with confirmation. This stacking is called confluence.
Premium/Discount + Trend Direction
The most important combination. In an uptrend, you only want to buy in the discount zone — buying cheap pullbacks within an upward trend. In a downtrend, you only want to sell in the premium zone — selling expensive rallies within a downward trend. This combination keeps you trading with the trend AND from the right side of the range simultaneously, which is a high-probability position.
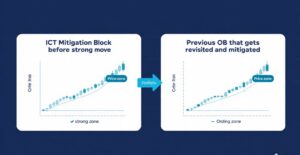
Premium/Discount + Order Blocks
An order block that sits in the discount zone is a far stronger buy setup than one in the premium zone. When your order block aligns with the correct premium/discount zone, you have two signals agreeing — the institutional entry zone AND the favorable pricing. This confluence dramatically improves the quality of the setup.
Premium/Discount + Liquidity Sweeps
A liquidity sweep that happens in the discount zone, sweeping the lows before reversing up, is a powerful buy signal — the sweep grabbed liquidity AND price is cheap. Combining the timing of a sweep with the pricing of the discount zone creates some of the highest-probability setups available.
Premium/Discount + Fair Value Gaps
A fair value gap located in the discount zone makes a stronger buy entry, while one in the premium zone makes a stronger sell entry. The gap gives you the precise entry; the zone confirms you are entering from the right side of the range. Together they form a complete, confluent setup.
The lesson is clear: premium and discount zones are not meant to be used in isolation. They are a filter and a confluence factor that makes all your other concepts sharper. The best setups happen when price is in the right zone AND aligned with the trend AND showing another signal like an order block or sweep. Stack the signals, and your probability climbs.
Real Pattern: The Trade That Premium/Discount Saved
Consider a trader watching Gold in an uptrend. They spot what looks like a buy setup — an order block forming as price climbs. They are tempted to buy immediately. But first, they check the premium/discount zones.
They draw the range from the recent swing low to the swing high, mark the 50% midpoint, and discover that price is currently in the PREMIUM zone — the expensive upper half. The order block they wanted to buy was in premium territory. Buying here would mean buying expensive, right where the smart money is more likely to be selling. They hold off.
They wait. Price pulls back, dropping into the DISCOUNT zone — the cheap lower half. Now a fresh order block forms in the discount zone, aligned with the uptrend. They buy here: trend up, price in discount, order block present. Three signals agreeing. Price bounces from the discount zone and continues up in the trend direction. The trade works cleanly.
Lesson: The premium/discount filter stopped the trader from buying expensive and waited for them to buy cheap. Same trend, same order block concept — but entering from the discount zone instead of premium made the difference between a poor entry and an excellent one.
Where Beginners Go Wrong With Premium and Discount
They Buy in Premium and Sell in Discount
Even after learning the concept, the psychological pull is strong. Price climbing into premium feels exciting, so beginners buy there anyway. Price falling into discount feels scary, so they avoid buying or even sell there. The whole point of the concept is to override this natural instinct. If you find yourself buying expensive and selling cheap, the premium/discount framework is screaming at you to stop — listen to it.
They Draw the Range Incorrectly
The entire concept depends on choosing the right high and low to define your range. Beginners often pick random or insignificant points, which gives them a meaningless midpoint and useless zones. The high and low must be significant swing points that represent a real, meaningful range. Getting the range right is the foundation — get it wrong, and the zones tell you nothing useful.
They Use It in Isolation
Premium and discount alone is not a complete strategy. Beginners sometimes buy in discount or sell in premium without any other confirmation, and get caught when the broader trend or structure was against them. The zones are a filter and a confluence factor, not a standalone signal. Always combine them with trend direction and at least one other concept for a quality setup.
They Think Knowing the Concept Makes Them Profitable
The familiar deepest trap. Understanding premium and discount zones feels like a powerful insight — and it is, as a filter. But knowing the concept and trading it profitably under real pressure are different skills. The Data Pips Team has seen countless traders who understand the concept perfectly, yet still buy in premium because their emotions overrode their analysis in the moment. Real-time discipline — actually waiting for price to reach discount when every instinct says buy now — is a skill that only experience and emotional control build. Our guide on mechanical discipline covers exactly this challenge.
— Data Pips Team
The Truth About Premium and Discount Nobody Tells Beginners
1. The Hard Part Is Psychological, Not Technical
Drawing the zones is easy — it takes thirty seconds with a Fibonacci tool. The genuinely hard part is acting on them, because buying in discount means buying when price is falling and everything feels scary, while selling in premium means selling when price is rising and everything feels strong. The concept asks you to do the emotionally uncomfortable thing every time. This is why the concept is technically simple but practically difficult, and why your emotional discipline matters far more than your understanding.
2. The Range You Choose Changes Everything
The same price could be in premium on one range and discount on another, depending on which high and low you use. This is why choosing the right, significant range matters so much, and why it involves some judgment. Anchor your range to meaningful structural points, ideally on higher timeframes, for the most reliable zones. A poorly chosen range gives you misleading zones that hurt more than help.
3. It Works With the Trend, Not Against It
Premium and discount is most reliable when used WITH the trend. In a strong uptrend, buying discount pullbacks works well. But trying to sell every premium level in a powerful uptrend — fighting the trend just because price is “expensive” — gets you run over. The zones tell you where to enter, but the trend tells you which direction to favor. Use them together; do not use premium/discount to justify trading against a strong trend.
4. Equilibrium Itself Is a Decision Point
The 50% midpoint — equilibrium — is significant beyond just dividing the zones. Price often reacts at the equilibrium level itself, and how price behaves there can confirm direction. When price is sitting right at equilibrium, it is neither clearly cheap nor expensive, which is often a lower-probability area to trade. Many traders prefer to wait for price to move clearly into discount or premium rather than trading right at the midpoint.
5. This Filter Will Not Fix a Discipline Problem
The familiar hard truth. Premium and discount zones are a powerful filter, but they do not provide discipline, risk management, or emotional control. A trader who knows the concept but still buys in premium out of excitement, oversizes positions, or revenge trades will still lose. The filter improves your analysis; your psychology determines whether you actually follow it. Most traders need to work on their discipline far more than they need another concept to add to their collection.
Your Premium and Discount Practice Plan
Now It’s Your Move
- Learn the simple rule cold. Buy in discount (below the midpoint, cheap), sell in premium (above the midpoint, expensive). Above 50% = premium, below 50% = discount. Memorize it.
- Practice drawing zones with the Fibonacci tool. Take a clear range, draw from low to high, and the 50% level is your dividing line. Do this on many charts until it is automatic.
- Always check the zone before any trade. Ask: is price in premium or discount right now? This single question filters out a huge category of bad trades.
- Combine with the trend. In an uptrend, buy discount pullbacks. In a downtrend, sell premium rallies. Trend plus zone is a powerful combination.
- Stack with other concepts. An order block, liquidity sweep, or fair value gap in the correct zone is a high-probability setup. Look for confluence, not isolated signals.
- Fight the emotional pull. Buying discount feels scary, selling premium feels wrong. That discomfort is the concept working. Train yourself to act against the instinct that makes most traders lose.
- Anchor your range to significant points. Use meaningful swing highs and lows, ideally on higher timeframes, to define your range. A good range gives reliable zones; a bad range gives noise.
Frequently Asked Questions
Premium and discount zones divide a price range into two halves based on the midpoint. The premium zone is the upper half, where price is “expensive” relative to the range — this is where you look to sell. The discount zone is the lower half, where price is “cheap” — this is where you look to buy. The 50% midpoint, called equilibrium, divides them. The concept is the institutional version of “buy low, sell high”: buy in the discount zone when price is cheap, and sell in the premium zone when price is expensive, which is exactly what smart money does.
First, identify a clear price range with a significant swing high and swing low. Then find the midpoint (50% level) between them — the easiest way is to use the Fibonacci retracement tool on your platform, drawing from the low to the high, which automatically marks the 50% level. Everything above the 50% midpoint is the premium zone (sell area), and everything below it is the discount zone (buy area). Some traders shade these areas in different colors for clarity. Once drawn, you can instantly see whether current price is in premium or discount.
You should buy in the discount zone, where price is cheap (below the 50% midpoint), and sell in the premium zone, where price is expensive (above the midpoint). This is the opposite of what most retail traders instinctively do — they buy when price is high and exciting (premium) and sell or avoid buying when price is low and scary (discount), which is buying expensive and selling cheap. The premium/discount framework helps you override this losing instinct and align with how institutions actually trade: accumulating in discount and distributing in premium.
Equilibrium is the 50% midpoint of a price range — the line that divides the premium zone (above) from the discount zone (below). It represents the “fair value” or balance point of the range, where price is considered neither clearly cheap nor clearly expensive. Price often reacts at the equilibrium level, and when price is sitting right at equilibrium, it is generally a lower-probability area to trade because it lacks the pricing edge of being clearly in discount or premium. Many traders prefer to wait for price to move decisively into discount or premium rather than trading at the equilibrium midpoint.
No — premium and discount zones work best as a filter and confluence factor combined with other concepts, not as a standalone strategy. The most powerful setups occur when price is in the correct zone AND aligned with the trend AND showing another signal like an order block, liquidity sweep, or fair value gap. For example, an order block in the discount zone within an uptrend is far stronger than an order block alone. Using premium and discount in isolation, without considering the trend or other confirmation, leads to mistakes. Stack the signals for high-probability setups.
This is one of the most common struggles, and it is psychological rather than technical. When price climbs into the premium zone, it feels strong, exciting, and safe — so the instinct to buy is powerful, even when you know logically that you should be buying in discount instead. Buying in discount feels scary because price is falling. The premium/discount concept asks you to do the emotionally uncomfortable thing: buy when it feels scary and sell when it feels strong. Overcoming this requires building genuine emotional discipline, which only develops through practice, journaling, and experience — knowing the concept is not enough on its own.
They are related but different. Support and resistance are specific horizontal levels where price has historically reacted. Premium and discount zones are broader areas defined by dividing a range in half at the 50% midpoint, indicating whether price is relatively expensive or cheap within that range. Support and resistance tell you where price might react; premium and discount tell you whether the current price is a good value to buy or sell. Many traders use both together — for instance, looking for a support level that also sits in the discount zone makes an especially strong buy area.
Now It’s Your Move
Most traders lose because they do the opposite of what makes money. They buy when price is high and exciting, and sell when it is low and scary. They buy expensive and sell cheap, over and over, never understanding why their accounts bleed. Premium and discount zones fix this — not by being complicated, but by being a simple, visual filter that tells you whether price is cheap or expensive within its range.
Above the 50% midpoint is premium — expensive, a place to sell. Below it is discount — cheap, a place to buy. Draw the range, find the midpoint, and you instantly know which side of the market you are on. Buy in discount, sell in premium — the institutional version of buy low, sell high, made concrete on your chart.
But remember the deeper truth: the concept is technically simple and emotionally difficult. Buying in discount means buying when price is falling and everything in you says wait. Selling in premium means selling when price is rising and everything feels strong. The concept asks you to act against your instincts every time — which is exactly why most traders, even those who know it, fail to do it. Your discipline, not your knowledge, determines whether this filter actually helps you.
Combine premium and discount with the trend and with your other concepts — order blocks, liquidity sweeps, fair value gaps. Stack the signals. Wait for price to reach the right zone. Fight the emotional pull to trade from the wrong side. And give yourself the screen time to make this a reflex.
You now understand a filter that directly counteracts the most common way traders lose. Use it to stop being the retail trader who buys the top and sells the bottom — and start trading from the side the smart money is on.
For your next steps, build on this with the concepts it combines with: order blocks, liquidity sweeps, and market structure. Then tie it all together with our complete ICT trading strategy guide.