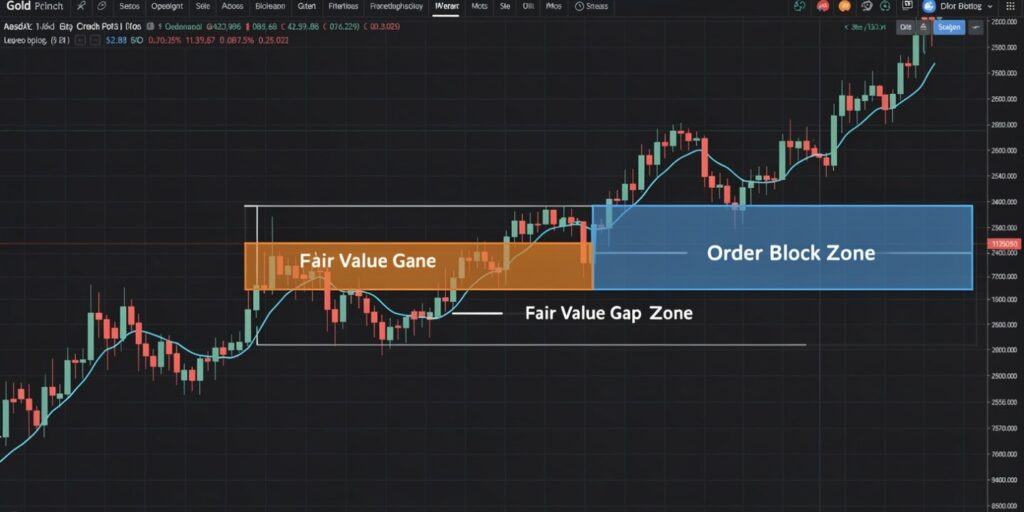
- A Fair Value Gap shows where price moved too fast to be efficiently traded. An Order Block shows where institutional orders actually sit.
- Order Blocks tend to hold more reliably than Fair Value Gaps alone, because they represent real capital committed at a real price, not just a visual imbalance.
- The highest-probability setups combine both — price filling an FVG that leads directly into a strong Order Block.
- None of this technical skill matters without risk discipline. A perfect Order Block read with no risk management still loses accounts.
Order blocks and fair value gaps are two of the most talked-about concepts in modern price action trading, and for good reason — they are not abstract indicators lagging behind price. They are a direct attempt to read the actual footprints institutions leave behind when they move serious size through the market.
Most retail traders spend years chasing a “Holy Grail” strategy, bouncing between indicators, signal services, and random setups that work for a few weeks before falling apart. The traders who eventually find consistency tend to land on the same realization: the market is not random. It is driven by the buying and selling decisions of large institutional players, and their activity leaves visible, readable evidence on the chart.
This guide from the Data Pips Team breaks down exactly what order blocks and fair value gaps are, how to identify them on a real chart, why order blocks often outperform fair value gaps used alone, and how to apply both concepts with the risk discipline that actually keeps an account alive long enough to benefit from them.
What Is a Fair Value Gap?
A Fair Value Gap, commonly shortened to FVG, is a visual representation of market inefficiency. In a perfectly balanced market, price moves smoothly, with every level genuinely traded between buyers and sellers. When a large institution — a bank, a hedge fund, a major market participant — enters a significant position, the volume of that order creates a sudden, forceful price move that skips over levels rather than trading through them gradually.
This displacement happens fast enough that it leaves a visible gap on the chart. You can identify it by looking at a sequence of three candles. The first candle marks the starting point. The second candle is the impulse candle — a large, energetic move with a long body. The third candle continues the follow-through. If the wick of the first candle and the wick of the third candle do not touch or overlap, the empty space left in the middle of the second candle is your Fair Value Gap.
The market tends to revisit these gaps over time to “fill” the inefficiency, offering fair value to the price levels that were skipped during the initial surge. For traders, these gaps function as price magnets, often marking where a retracement is likely to pause or reverse before the original trend resumes.
What Is an Order Block?
If a Fair Value Gap is the path price took during displacement, an Order Block is the engine room where the move actually began. An Order Block is a specific price zone where institutional traders placed significant buy or sell orders before a major move.
In practical terms, a Bullish Order Block is the last “down” candle — representing selling — immediately before a sharp upward move that breaks the previous market structure. A Bearish Order Block is the opposite: the last “up” candle before a significant decline.
The logic behind this is straightforward once you understand institutional order flow. When large players want to push price higher, they often create a brief window of selling pressure specifically to gather liquidity — collecting the orders of retail traders positioned against the coming move. Once their buy orders are filled at that level, price accelerates higher. Because institutional order sizes are so large, not every order fills instantly, leaving resting orders at that specific price zone.
“An FVG shows you where price was inefficient. An Order Block shows you where real money was actually spent. Those are very different kinds of evidence.”
— Data Pips Team
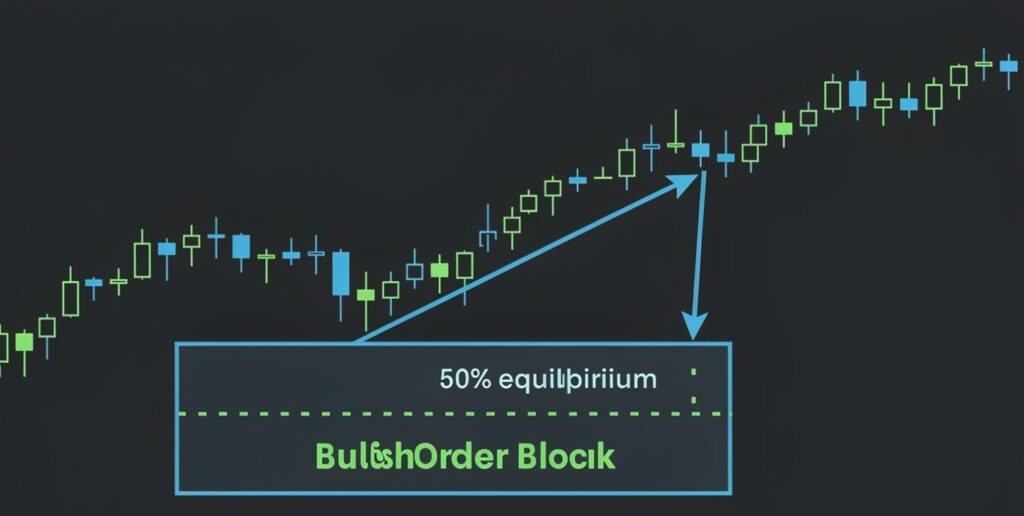
The 50% Rule — Trading the Equilibrium of an Order Block
One of the more refined ways to use an Order Block is not simply trading its outer edges, but marking its center — often called the mean threshold, or the 50% level. Institutions generally want the best possible average price for their position, which means they frequently wait for price to retrace deep into the block, often hitting close to that 50% mark, before the move resumes.
For a trader, this offers a high-probability entry zone with a meaningfully tighter stop-loss compared to entering at the very edge of the block. The trade-off is patience — waiting for price to reach that deeper level requires discipline, since the temptation to enter early at the first touch of the block is strong.
| Concept | What It Represents | Reliability |
|---|---|---|
| Fair Value Gap | A price inefficiency left behind by fast displacement | Can be “leaky” — price may fill it and keep going |
| Order Block | A zone where real institutional orders were placed | Tends to act as a stronger structural wall |
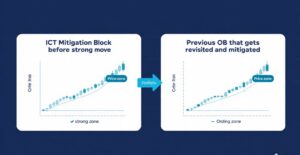
Why Order Blocks Often Outperform Fair Value Gaps Used Alone
In the ongoing debate between trading Order Blocks versus Fair Value Gaps, most experienced price action traders lean toward giving more weight to the Order Block. A Fair Value Gap shows where price is statistically likely to return, but it can be unreliable on its own — sometimes price fills the gap completely and continues moving through it without reacting, taking out a stop-loss placed too close to the gap’s edge.
An Order Block represents something more concrete: a level where actual capital was committed. It functions as a psychological and financial wall rather than just a visual imbalance. This is exactly why combining the two concepts produces a stronger setup than either alone — waiting for price to fill a Fair Value Gap that leads directly into a high-quality Order Block creates genuine confluence, which is the foundation of most ICT (Inner Circle Trader) and broader Smart Money Concepts methodologies.
Our complete guide on ICT and Smart Money Concepts trading expands on how these confluence-based setups fit into a broader institutional trading framework.
Where This Works Best: Gold and Forex vs. Crypto
Order Blocks and Fair Value Gaps are not equally reliable across every market. Gold (XAUUSD) and major forex pairs remain the strongest environments for these concepts, because these markets are deep, highly liquid, and heavily influenced by predictable institutional trading cycles — including the New York and London session windows where the majority of meaningful institutional volume flows through.
Cryptocurrency markets can technically display similar order block and gap behavior, but they carry a significant added risk: lower regulation and extreme volatility frequently lead to what traders call “trap trading,” where price wicks well past a valid Order Block specifically to trigger stop-losses before reversing in the originally expected direction. For traders prioritizing long-term consistency, mastering these concepts on gold or major currency pairs tends to be considerably more rewarding and predictable than applying them to highly volatile, thinner crypto markets.
The Data Pips Team has applied these exact concepts directly across years of trading XAUUSD and forex pairs, and the consistency advantage of major liquid markets over thinner, more manipulated ones has been a recurring, hard-earned lesson.
Early use of Fair Value Gaps in isolation, without confirming Order Block confluence, repeatedly led to entries that looked technically correct but failed because price simply continued through the gap without reacting. The shift that improved consistency was waiting specifically for price to fill a Fair Value Gap on its way into a clearly defined Order Block, rather than treating either signal as sufficient on its own. This combined approach reduced the frequency of trades significantly, but the trades that remained had a noticeably higher success rate — a clear demonstration that fewer, higher-quality setups consistently outperform a higher volume of lower-confidence entries.
Risk Management — The Part That Determines Whether Any of This Works
Understanding Order Blocks and Fair Value Gaps perfectly does not protect a trading account on its own. Without genuine risk discipline, the market will eventually take the capital of even the most technically skilled trader. One of the most common and most expensive mistakes is revenge trading after a loss — increasing position size or frequency in an emotional attempt to immediately recover what was lost.
If price breaks decisively through a valid Order Block, that is information, not a personal failure. It signals that the market narrative has genuinely changed. The disciplined response is to accept the loss, analyze the resulting break of structure, and look for the next valid setup rather than fighting the new direction. Our complete guide on stopping revenge trading covers this exact failure pattern and how to interrupt it before it compounds.
A professional trader does not aim to be right on every trade. The realistic target is being right roughly 50 to 60% of the time, combined with a risk-to-reward ratio of at least 1:3. By using Order Blocks to identify precise, high-probability entries, a trader can keep individual risk small while allowing potential gains to significantly outweigh potential losses across a large enough sample of trades.
What Nobody Tells You About Order Blocks and Fair Value Gaps
1. Not every gap or block is worth trading. New traders often mark every visible inefficiency or candle pattern as a valid setup, leading to overtrading on low-quality signals. Genuine Order Blocks typically form around clear breaks of market structure, not just any noticeable candle — context matters more than the pattern itself.
2. Higher timeframes generally produce more reliable zones than lower ones. An Order Block identified on a 4-hour or daily chart tends to hold with significantly more reliability than one found on a 1-minute or 5-minute chart, simply because larger timeframes better reflect genuine institutional positioning rather than short-term noise.
3. Confluence beats complexity. Traders often try to stack five or six different technical concepts onto a single setup, assuming more confirmation always means more safety. In practice, two or three well-understood, genuinely aligned signals — like an FVG leading into a strong Order Block — consistently outperform overcomplicated setups that are difficult to execute under real-time pressure.
4. These concepts describe probability, not certainty. Even a textbook-perfect Order Block setup fails a meaningful percentage of the time. Treating these tools as a guaranteed signal rather than a probability edge is one of the fastest ways to take oversized risk and suffer outsized losses when a setup does not play out as expected.
5. Mastering the technical reading is the easier half of the skill. Identifying a valid Order Block or Fair Value Gap on a chart can be learned in weeks. Executing that knowledge consistently under real financial pressure, without hesitation or emotional override, takes considerably longer to develop. Our guide on why traders exit trades too early covers exactly this execution gap — the technical knowledge was never the bottleneck.

Putting It Together: A Practical Approach to Reading the Chart
Start with the higher timeframe to identify the broader market structure and any significant Order Blocks formed around clear structural breaks. From there, drop to a lower timeframe to look for a Fair Value Gap forming on the way into that higher-timeframe Order Block — this is the confluence that separates a high-probability setup from a guess.
Mark the 50% equilibrium level of the Order Block as your ideal entry zone, and set a stop-loss just beyond the block’s outer edge, where a genuine break of structure would invalidate the setup entirely. This structure naturally enforces tight, defined risk on every trade, which is the foundation that allows a 1:3 or better risk-to-reward ratio to actually compound over time.
The New York and London session windows tend to provide the cleanest institutional order flow for this kind of analysis. Our guide on ICT New York session theory covers exactly how session timing interacts with these setups in more detail.
Quick Action Steps: Start Applying This to Your Charts This Week
Step 1: Pull up a 4-hour gold or major forex pair chart and manually mark the last five clear breaks of market structure you can identify.
Step 2: For each break, identify the Order Block — the last opposing candle before the structural break occurred.
Step 3: Look for any Fair Value Gap that formed on the way into each Order Block, and note how price reacted when it reached that zone.
Step 4: Practice marking the 50% equilibrium level on at least ten historical Order Blocks before risking any live capital on this approach.
Step 5: Set a strict risk percentage per trade and a minimum 1:3 risk-to-reward target before applying this strategy with real money.
For the discipline framework that makes any technical strategy actually sustainable over time, read our complete guide on trading patience and risk management.
Frequently Asked Questions
What is the difference between an order block and a fair value gap?
A Fair Value Gap is a visual price inefficiency caused by a fast, forceful market move that skips over levels. An Order Block is a specific price zone where institutional orders were actually placed before a significant move. The FVG shows where price moved through quickly; the Order Block shows where real capital was committed.
Which is more reliable, order blocks or fair value gaps?
Order Blocks generally hold with more reliability because they represent actual institutional order placement rather than just a visual price gap. Fair Value Gaps can be “leaky,” meaning price sometimes fills the gap and continues moving without reacting. The strongest setups combine both concepts together.
What is the 50% rule for trading order blocks?
The 50% rule refers to marking the equilibrium, or center, of an Order Block as a preferred entry zone. Institutions often wait for price to retrace deep into a block, near this 50% level, before continuing the original move, which offers traders a tighter, more precise entry with a smaller stop-loss.
Do order blocks and fair value gaps work on cryptocurrency markets?
These concepts can technically apply to crypto markets, but crypto’s high volatility and lower regulation make it more prone to stop-loss hunting, where price wicks past a valid zone before reversing. Gold and major forex pairs are generally considered more reliable and consistent environments for applying these concepts.
What timeframe works best for identifying order blocks?
Higher timeframes, such as 4-hour or daily charts, generally produce more reliable Order Blocks than lower timeframes like 1-minute or 5-minute charts. Larger timeframes better reflect genuine institutional positioning rather than short-term market noise.
How important is risk management when trading order blocks?
Risk management is essential and arguably more important than the technical analysis itself. Even a well-identified Order Block setup will fail a meaningful percentage of the time. Without a strict risk percentage per trade and a strong risk-to-reward ratio, even accurate technical analysis will not protect a trading account long-term.
Disclaimer: This article is for educational and informational purposes only and does not constitute financial or trading advice. Trading forex, gold, and other leveraged instruments carries substantial risk of loss and is not suitable for all investors. Past performance and technical patterns described in this article do not guarantee future results. The Data Pips Team makes no guarantees regarding trading outcomes from applying the strategies described in this article. Always trade with capital you can afford to lose and consult a licensed financial professional before making trading decisions.