
Trading does not have to be complicated. The traders who build consistent, long-term results are almost never the ones with the most indicators on their charts. They are the ones who deeply understand a small number of high-probability concepts and apply them with discipline and patience.
In this article, we break down the core ICT framework — the same foundational approach used by professional traders to find clean, high-probability setups in Forex and Crypto — stripped of complexity and explained in plain terms.
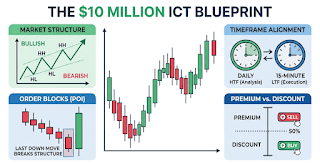
Table of Contents
1. Understanding Market Structure
Before anything else — before order blocks, before fair value gaps, before entries — you need to understand what the market is doing at the macro level. Market structure is the foundation that everything else is built on. Without it, every other concept becomes guesswork.
The market moves in three ways and only three ways:
- Bullish: The market is making continuous Higher Highs (HH) and Higher Lows (HL). Each swing high is higher than the last. Each pullback holds above the previous low. This is an uptrend.
- Bearish: The market is making continuous Lower Highs (LH) and Lower Lows (LL). Each swing high is lower than the last. Each bounce fails below the previous high. This is a downtrend.
- Consolidation: The market is moving sideways, trapped between a defined range high and range low. Price is not making meaningful progress in either direction.
Pro Tip: Focus your trading in trending environments. Consolidation produces choppy, low-quality setups that eat through capital. Trending markets produce clean, directional setups where the ICT framework performs best.
Your first job on any chart is to answer one question: which of these three states is the market currently in? Everything else follows from that answer.
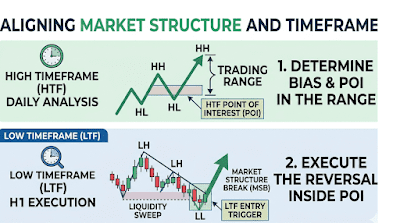
2. The Power of Two Timeframes
One of the most common mistakes in retail trading is operating on a single timeframe. Professional traders always contextualize their entries within a higher timeframe narrative. The two-timeframe approach is not optional — it is structural.
High Timeframe (HTF) — Daily or 4-Hour: This is where you build your directional bias. What is the market doing on the Daily or H4? Is it bullish, bearish, or consolidating? Where are the key levels — the swing highs, swing lows, order blocks, and areas of liquidity — that price is likely to target or respect? This is your roadmap.
Low Timeframe (LTF) — 1-Hour or 15-Minute: This is where you execute. Once the HTF has given you a direction and a specific area of interest, you drop to the LTF to look for confirmation and a precise entry. The LTF entry is surgical — a tight stop loss, a clear invalidation level, and a favorable risk-to-reward ratio.
The logic is simple: the HTF tells you where the market wants to go and from where. The LTF tells you exactly when to enter. Using only the LTF produces entries with no macro context. Using only the HTF produces entries that are too far from key levels for tight stops. Both timeframes together produce entries that are both contextually valid and technically precise.
3. Points of Interest (POI): Where to Do Business
A Point of Interest is a specific zone on the chart where institutional order flow has previously been active — and where it is likely to be active again. These are not arbitrary support and resistance levels. They are locations where the market has demonstrated that large participants are willing to buy or sell in size.
The ICT framework identifies three primary POIs:
Order Blocks (OB): The last one or two candles before a move that breaks market structure. When institutional traders accumulate or distribute a position, they leave a footprint in the candles immediately before the resulting move. When price returns to this zone, those same orders often become active again — creating a high-probability reaction point.
Breaker Blocks: A failed order block that, instead of supporting price, is broken through — and then becomes a resistance level on the way back up, or a support level on the way back down. The logic is that the traders who were wrong at the original order block are now trapped and looking to exit at break-even, creating supply or demand at that level.
Fair Value Gaps (FVG): When price moves aggressively in one direction, it sometimes skips over a range of prices entirely — leaving a visible gap between the high of one candle and the low of a candle two candles ahead. This gap represents inefficiency in the market. Price has a strong tendency to return to these gaps to “fill” them before continuing in the original direction.
The key to using POIs effectively is patience. You do not chase price to a POI — you wait for price to come to your level and then look for the confirmation signals described in the execution section below.
4. Premium vs. Discount: The Art of Buying Cheap and Selling Dear
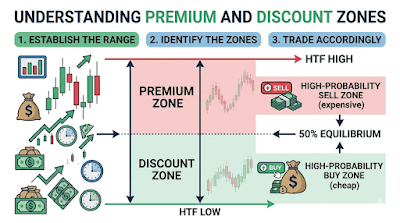
This concept filters out a large percentage of bad trades before they are entered. The principle is straightforward: never buy at premium prices and never sell at discount prices.
To apply it, take any trading range — identified by a clear swing high and a clear swing low — and mark the 50% midpoint of that range. This midpoint divides the range into two halves:
- Discount Zone (Below 50%): This is where you look for Long (Buy) positions. Price is relatively cheap within the range. Buying here gives you the directional advantage of price moving back toward the range high.
- Premium Zone (Above 50%): This is where you look for Short (Sell) positions. Price is relatively expensive within the range. Selling here gives you the directional advantage of price moving back toward the range low.
Professional trading is fundamentally about buying at a discount and selling at a premium. When you combine this with your HTF directional bias — only looking for longs in a bullish market structure when price is in the discount zone of a key HTF range — the quality of your setups improves dramatically.
5. The Execution: The Breaker Entry
The Breaker entry is one of the most mechanical and reliable entry patterns in the ICT framework precisely because it has a clear, sequential structure that removes most of the subjectivity from the entry decision.
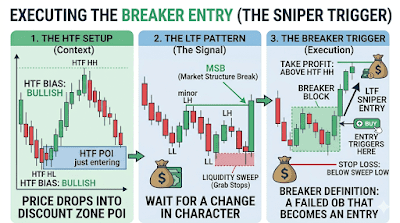
Here is the four-step sequence:
- Wait for price to reach your HTF Order Block. You have identified this level on the Daily or H4. You are not entering until price comes to you. Patience here is not optional.
- On the LTF, look for a Liquidity Sweep. When price reaches the HTF POI, watch for it to briefly take out a previous low (in a bullish setup) or a previous high (in a bearish setup). This sweep hunts the stop losses of traders who entered too early, and it is the signal that the move is about to shift.
- Wait for a Market Structure Break (MSB) in the opposite direction. After the liquidity sweep, price should break a swing high (bullish) or swing low (bearish) on the LTF — confirming that the directional shift is real and that smart money has reversed its position.
- Enter at the Breaker Block — the zone created by the candles that were swept. Place your stop loss below the sweep low (for longs) or above the sweep high (for shorts). Your target is the next significant HTF level in the direction of your trade.
This four-step sequence produces entries that are: aligned with HTF structure, confirmed by a liquidity sweep, validated by a market structure break, and entered at a level with a clear and logical stop placement. Each element filters out bad trades. All four together produce high-probability setups.
6. Risk Management: The Non-Negotiable Foundation
No strategy — regardless of how precise the entry, how clear the structure, or how strong the confluence — works 100% of the time. The market is probabilistic. Losses are inevitable. What separates profitable traders from unprofitable ones is not their win rate. It is how they manage the relationship between their winning trades and their losing trades.
- Aim for a minimum 1:2 Risk-to-Reward ratio. For every unit of risk you take, you should be targeting at least two units of potential reward. This means that even with a 40% win rate — losing more trades than you win — your account grows because your winners are twice the size of your losers.
- Never risk more than 1-2% of your account on any single trade. This is not a suggestion. It is the structural rule that keeps you in the game long enough for your edge to play out across a large enough sample of trades.
- Define your stop loss before your entry. Your stop loss is not a hope — it is a pre-defined level that tells you exactly when you are wrong. If price reaches that level, the trade is invalid and you exit without hesitation.
- Track your results over samples, not individual trades. Your edge exists at the level of 50 or 100 trades, not individual positions. Evaluate your system’s performance over batches, not single outcomes.
Bringing It All Together: The Simplified Checklist
Before entering any trade using this framework, run through this checklist:
- What is the HTF market structure? Bullish, bearish, or consolidating?
- Where are the HTF POIs — the order blocks, breaker blocks, and fair value gaps — that price is likely to target?
- Is price currently in a premium or discount zone relative to the relevant HTF range?
- Am I only looking for longs in discount zones during bullish structure? Only looking for shorts in premium zones during bearish structure?
- On the LTF, have I seen a liquidity sweep followed by a market structure break?
- Is my stop loss placement logical? Does my target give me at least a 1:2 RR?
If all six boxes are checked, you have a high-probability setup. If any are not, you wait.
Stop overcomplicating your charts. Master the range, identify the POI, wait for the sweep and the break, and execute at the Breaker. That is the framework. The rest is patience and risk management.
About the Author
Shurah Beel Hamid is an active trader and content creator who writes about trading psychology, ICT and SMC concepts, and the practical frameworks behind consistent performance in Forex and crypto markets.
Disclaimer: This article is for educational purposes only and does not constitute financial advice. Trading involves significant risk of loss. Always conduct your own research before making any trading decisions.